How to Replace an SF6 Density Gauge in Schneider RM6 Switchgear
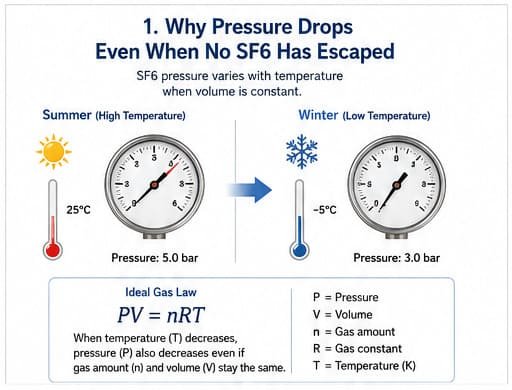
A low gas alarm triggering on your Schneider RM6 switchgear doesn’t always mean there’s an SF6 leak. In most field cases, the issue stems from a malfunctioning density gauge, rather than actual gas loss inside the equipment.
For power utilities, industrial sites and switchgear maintenance teams, learning to inspect, troubleshoot and replace a faulty RM6 SF6 density gauge is vital. We supply compatible SF6 gas density monitor as direct replacement units for Schneider RM6 panels.
Proper handling keeps equipment running steadily and cuts down on unplanned downtime. This practical guide breaks down how the RM6 density gauge works, common failure signs, standard replacement steps, and key tips for picking a suitable replacement unit.
What Is the Role of SF6 Density Gauges in RM6 Switchgear?
How It Monitors SF6 Gas
The SF6 density gauge runs continuous real-time monitoring for the sealed gas compartment of RM6 switchgear. It displays current gas status visually and activates alarm signals once gas density drops below preset thresholds.
Since SF6 gas provides insulation for medium-voltage switchgear, stable gas density directly guarantees safe equipment operation. The gauge acts as an early warning system to help staff spot risks before insulation performance declines.
Why Accurate Gas Monitoring Matters
RM6 switchgear is widely deployed across power distribution networks, renewable energy stations, commercial buildings and industrial facilities. If SF6 density falls below the safe operating range, insulation performance will weaken, raising the risk of equipment failure. With reliable density monitoring, maintenance teams can detect anomalies early and arrange repairs in a timely manner.
Why Do RM6 SF6 Density Gauges Fail?
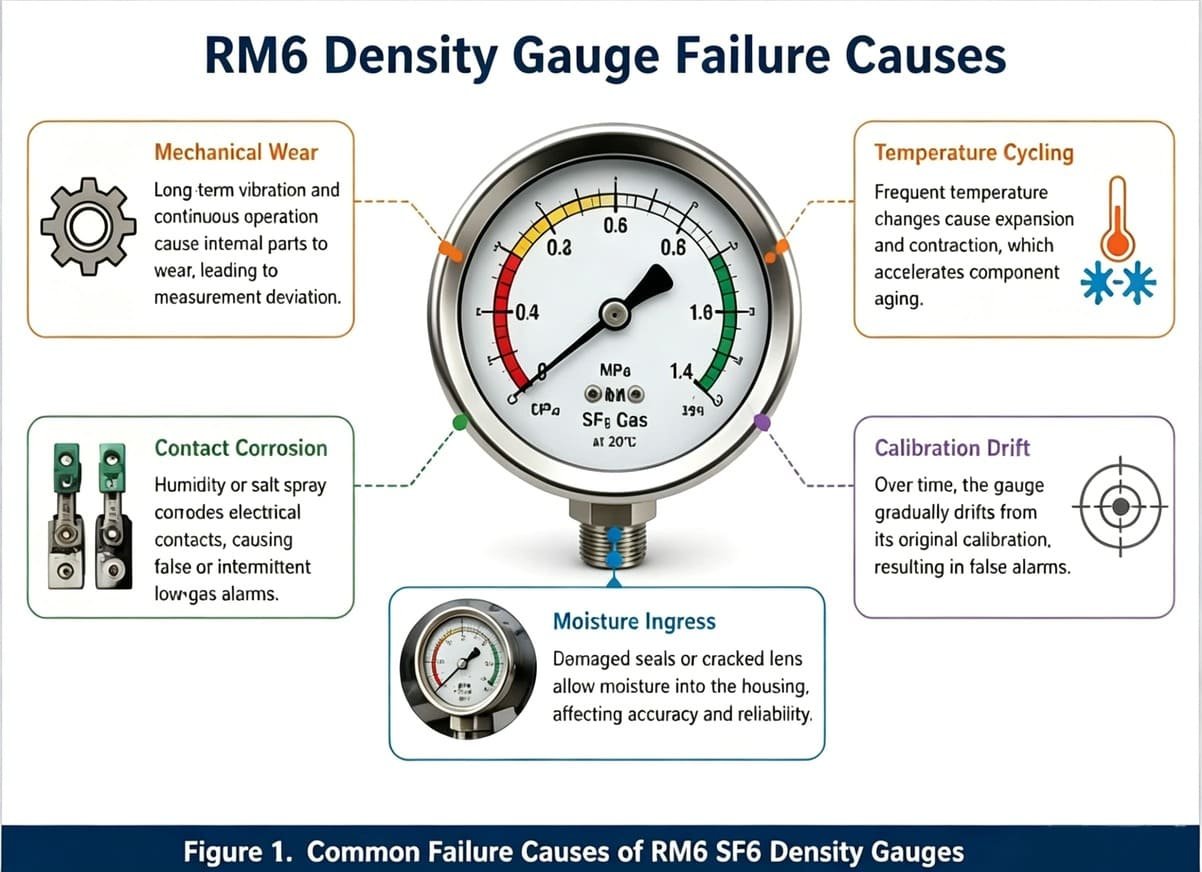
SF6 density gauges are built to last for decades inside RM6 switchgear, yet multiple environmental and mechanical factors slowly erode their precision and reliability over time. Below are the most frequent root causes of faulty readings and false gas alarms in field units.
Mechanical Wear
Every density gauge relies on tiny, delicate mechanical parts that run nonstop alongside your switchgear. After years of constant vibration and regular operation, internal components wear down little by little. This gradual wear shifts measurement baselines and leads to inconsistent, unreliable readings.
Repeated Temperature Swings
Many RM6 cabinets sit outdoors, exposed to drastic seasonal hot and cold shifts. Constant heating and cooling forces the gauge’s internal parts to expand and contract repeatedly. This ongoing cycle speeds up component aging and slowly ruins long-term measurement stability.
Terminal & Contact Corrosion
Coastal sites or facilities with high humidity create harsh operating conditions for gauge wiring and alarm contacts. Over years of exposure, metal terminals corrode easily. Corroded contacts trigger erratic, intermittent low-gas alerts that look identical to real SF6 leakage warnings.
Slow Calibration Drift
You won’t spot physical damage on the gauge, but its internal calibration still creeps away from factory-set standards as it ages. This silent drift is the top culprit behind false low-gas alarms on older RM6 switchgear across utility sites.
Internal Moisture Contamination
Worn gaskets, cracked front lenses or degraded sealing rings break the gauge’s waterproof barrier, letting moisture seep into the housing. Trapped moisture interferes with internal mechanical motion and skews all gas density measurements.
Recognizing these common failure modes gives maintenance teams a clear reference when troubleshooting low-gas alerts. It lets technicians quickly tell whether an alarm stems from genuine SF6 leakage, or a worn-out, malfunctioning density gauge instead.

Common Signs Your RM6 SF6 Density Gauge Needs Replacement
Repeated Low Gas Alarms With No Visible Leaks
False low gas alarms are the most typical sign of a faulty density gauge. Maintenance crews may conduct multiple leak tests, only to confirm the gas compartment is fully sealed. Persistent alerts under such circumstances usually point to inaccurate readings from the gauge itself.
Unstable Readings
A fully functional density gauge delivers steady, consistent data under normal working conditions. If the pointer fluctuates randomly, or readings fail to match results from professional calibration tests, the device needs to be replaced.
Physical Damage & Aging Issues
Long-term vibration, harsh outdoor environments and component aging will gradually affect the precision of mechanical sensors. Visible problems such as surface corrosion, cracked lens, internal moisture or a stuck pointer all indicate it is time for a new gauge.
Field Case: False Low-Gas Alarm on a 24kV RM6 Panel
Case Overview
A regional utility contractor faced continuous SF6 low-gas alarms on its 24kV Schneider RM6 switchgear after seven years of field operation.
Initial Inspection: No SF6 Leak Found
Since SF6 leakage compromises insulation safety, the maintenance team initially suspected a gas leak and conducted multiple rounds of inspections. However, tests with portable SF6 analyzers and electronic leak detectors confirmed the gas compartment was fully sealed, with no gas loss detected.
Root Cause: Aged Gauge Calibration Drift
Engineers further compared the on-site gauge readings with calibrated test equipment. The issue was traced to long-term mechanical aging, which caused the original SF6 density gauge to drift beyond its standard accuracy range and trigger false alarms.
Solution & Outcome
After replacing the faulty density gauge and recalibrating the alarm parameters, all false low-gas alarms stopped completely. The RM6 switchgear returned to normal and stable operation.
Key Takeaway
This case demonstrates that low-gas alarms do not always mean SF6 leakage. Gauge aging, calibration drift and component failure are common causes of false warnings. Accurate pre-replacement diagnosis helps reduce unnecessary maintenance work and redundant SF6 handling procedures.
First Step: Rule Out Real SF6 Leaks
Never rush to replace parts before confirming the root cause. A low density reading alone cannot prove an SF6 leak exists.
Field technicians need to compare gauge data with portable testing tools, and conduct full inspections on the gas compartment. You can use portable SF6 analyzers, electronic leak detectors, soap bubble checks for external joints or professional density verification devices for testing.
Distinguishing between a leak and a faulty gauge helps you avoid unnecessary replacement costs and extra maintenance work.
Tools & Safety Rules Before Replacement
Required Tools & Supplies
Prepare all items below before starting work to ensure smooth installation:
- New compatible RM6 SF6 density gauge
- Standard hand tools
- Calibration and testing instruments
- Complete personal protective equipment (PPE)
- Official manufacturer operation manuals
Critical Safety Notes
RM6 switchgear holds pressurized SF6 gas and live electrical parts. Strictly follow lockout and isolation procedures before any maintenance work. All on-site personnel must receive professional training and comply with local safety regulations as well as manufacturer guidelines.
Step-by-Step Replacement Process
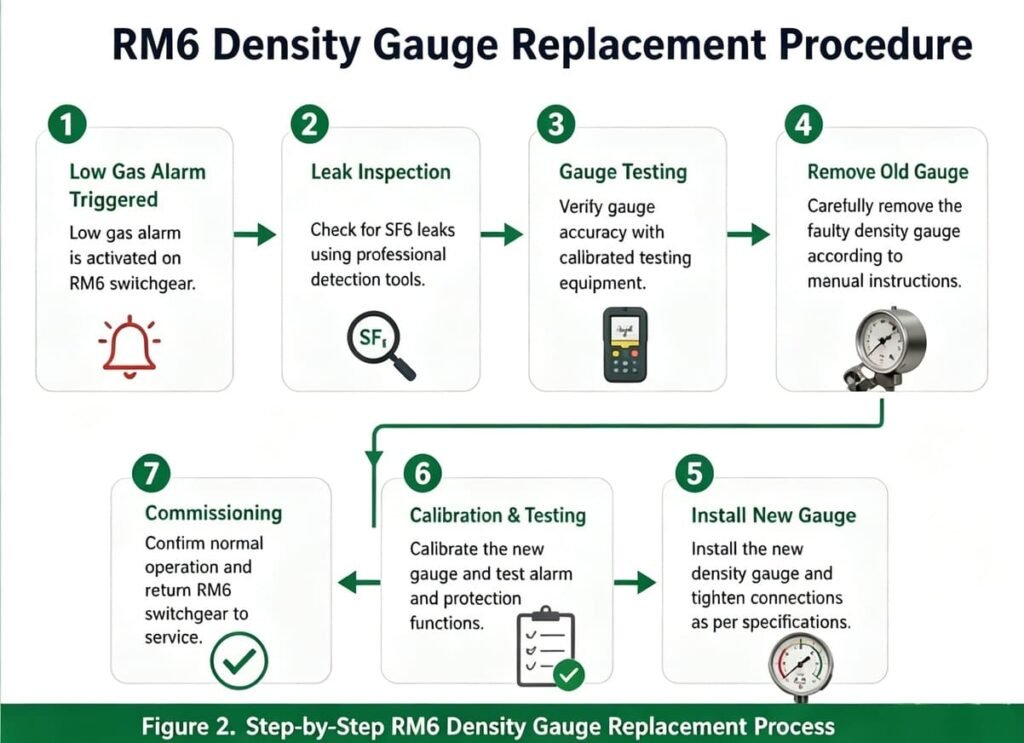
Step 1: Isolate and Secure the RM6 Panel
Follow on-site operating procedures to disconnect the equipment, and double-check all safety measures are in place before starting disassembly.
Step 2: Record Original Gas Data
Note down readings from the old gauge first, then use calibrated professional tools to verify the actual gas condition. This record will help you confirm whether the original gauge has failed.
Step 3: Remove the Faulty Gauge
Take off the defective gauge carefully in accordance with the manufacturer’s service instructions. Be careful not to scratch sealing surfaces, damage pipe fittings or break electrical connectors during removal.
Step 4: Install the New Density Gauge
Mount the new gauge following standard installation requirements and specified torque values. Make sure all connecting parts are fastened firmly.
Step 5: Inspect Sealing and Run Leak Tests
Check all sealing surfaces and joints to ensure no new leakage points are created during installation. Complete a full leak test before putting the equipment back into service.
Step 6: Test Alarm and Protection Functions
Simulate working conditions to verify alarm signals and interlock functions work normally. The replacement work is not finished until all monitoring and protection features operate as designed.
Calibration & Functional Testing for New Gauges
Even brand-new density gauges require inspection before formal commissioning. Complete calibration verification to confirm the unit works accurately across the full operating range and meets project technical standards.
After installation, test alarm trigger points where applicable, and check signal connection with the control system. This ensures the new gauge performs reliably under real operating conditions.
OEM vs Compatible Replacement Gauges for Schneider RM6
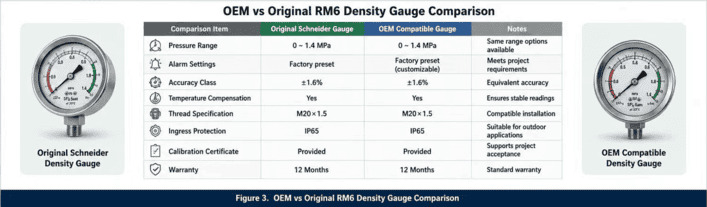
Many power utilities and switchgear service providers choose qualified OEM replacement gauges, which feature equivalent technical performance and often come with shorter lead times and more competitive prices.
When selecting a replacement unit, compare these core parameters to guarantee compatibility:
- Alarm threshold settings
- Pressure measurement range
- Accuracy grade
- Temperature compensation performance
- Thread specifications
- Ingress protection rating
How to Select a Trustworthy Density Gauge Supplier
Compliance & Certification
Prioritize suppliers whose products comply with IEC standards and local power utility specifications. Complete product certification and traceable documents are essential for formal projects.
Testing & Calibration Capability
Reliable suppliers can provide factory test reports and official calibration certificates. Complete quality documents also simplify project acceptance work.
Delivery & Technical Support
For faulty part replacement on running equipment, fast delivery and responsive after-sales support are crucial. Suppliers with a professional engineering team can quickly solve installation and compatibility problems.
Frequently Asked Questions
Can I replace the density gauge without evacuating SF6 gas?
It depends on the specific RM6 model and official maintenance rules. Always refer to the manufacturer’s guidelines before carrying out any work.
How often should RM6 density gauges be calibrated?
Most power teams arrange calibration during routine equipment maintenance, following internal operation standards. We cover full test steps, tolerance values and record keeping in our complete guide about calibrating SF6 density gauges.
What mainly causes false low gas alarms on RM6 switchgear?
Common reasons include defective density gauges, ambient temperature interference, damaged electrical contacts and calibration drift.
Can a density relay take the place of a standard density gauge?
Density relays offer extra alarm and safety interlock functions. You need to evaluate equipment compatibility first if you plan to make this upgrade. To fully understand the functional and performance gaps between ordinary pressure gauges and intelligent density relays, check our comparison article SF6 Density Relay vs Pressure Gauge: Why It Replaces Gauges in Modern GIS and RMU Switchgear.
What is the typical service life of an RM6 density gauge?
Service life varies by operating environment and daily maintenance. Most units can work stably for more than 10 years under normal conditions.
What is the standard SF6 working pressure for RM6 switchgear?
The value differs by equipment model and manufacturer design. Always check the official technical manual for reference.
How to tell if the problem lies with the gauge or the gas compartment?
Carry out professional leak detection and calibration tests to accurately identify the root cause.
Where to purchase replacement RM6 density gauges?
You can buy original parts from Schneider or choose qualified OEM suppliers that specialize in medium-voltage switchgear components.
Are OEM replacement density gauges compatible with Schneider RM6 switchgear?
Many OEM products are designed to meet equivalent technicalspecifications, but compatibility should always be verified beforeinstallation.
Conclusion
A faulty SF6 density gauge produces almost the same alerts as a real gas leak, so accurate troubleshooting is the key to efficient maintenance.
By following standardized inspection and replacement procedures, you can restore normal SF6 gas monitoring and avoid unnecessary service interruptions. Whether you manage power substations, industrial facilities or renewable energy projects, choosing high-quality replacement gauges and working with a reputable supplier will keep your RM6 switchgear safe and reliable for long-term operation.
Professional Medium & High Voltage Electrical Equipment Manufacturer