
RM6 Density Relay Calibration Guide: Step-by-Step SF6 Relay Testing Procedure
Introduction
An incorrectly calibrated SF6 density relay can cause false low-gas alarms, unexpected lockout trips, and unnecessary downtime in Schneider RM6 switchgear. In some cases, calibration drift may even prevent the relay from detecting actual SF6 gas loss, increasing operational and safety risks.
If you maintain Schneider RM6 switchgear or similar medium-voltage RMUs, accurate density relay calibration is essential for reliable operation. This guide explains the required tools, step-by-step calibration procedure, common mistakes, troubleshooting methods, and recommended maintenance practices to help ensure accurate relay performance.
Why Does an RM6 Density Relay Need Calibration?
Many field engineers mistakenly believe factory-calibrated relays stay precise throughout their service life. In fact, years of on-site operation trigger calibration drift due to multiple factors:
- Mechanical wear of internal linkage and spring parts
- Repeated temperature cycling in indoor and outdoor substations
- SF6 gas refilling and pressure recovery work
- New density relay replacement or cabinet retrofitting
- Regular preventive maintenance cycles
Typical abnormal signs of drifted relays:
- False low-gas alarms without real SF6 leakage
- Alarm signals that cannot reset normally
- Deviated alarm and lockout switching points
- Unstable SCADA remote alarm feedback
- Excessive hysteresis causing irregular relay action
Tools Required Before Calibration
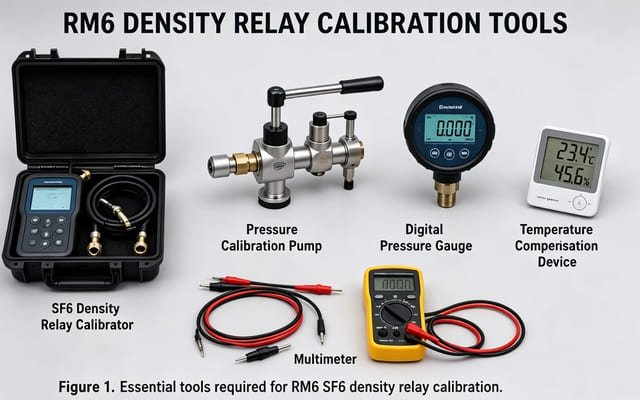
Precise calibration relies entirely on certified high-precision testing instruments. Unverified low-accuracy equipment will generate invalid test data and recurring relay drift. The full tool list for professional RM6 SF6 density relay calibration is shown below:
| Equipment | Purpose |
|---|---|
| SF6 Density Relay Calibrator | Simulate accurate SF6 gas density for static & dynamic testing |
| Pressure Calibration Pump | Deliver smooth, controllable pressure rise and release |
| Digital Pressure Gauge | High-precision reference for pressure comparison |
| Temperature Compensation Device | Offset ambient temperature interference to realize density-based calibration |
| Multimeter | Test electrical continuity of alarm and lockout contacts |
| Manufacturer Calibration Manual | Confirm official switching thresholds, tolerance range and hysteresis value |
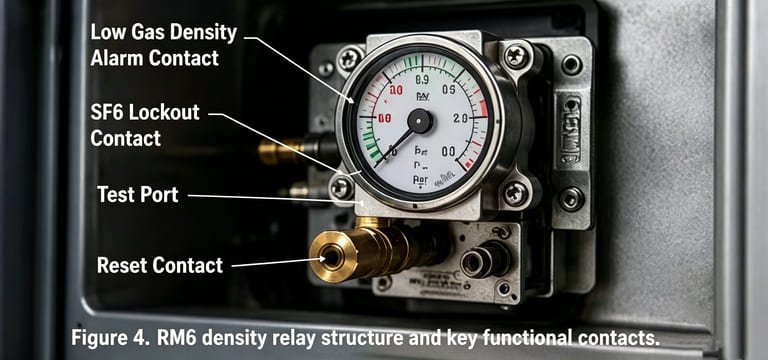
The core test object for all calibration workflows is the on-board density relay inside RM6 cabinet. Our SF6 gas density monitor supports direct on-site calibration and matches all Schneider RMU cabinet models perfectly.
International Standards Reference
Although calibration procedures may differ slightly among manufacturers, most medium-voltage switchgear maintenance practices are based on internationally recognized standards, including:
| Standard | Description |
|---|---|
| IEC 62271 | High-voltage switchgear and controlgear |
| IEC 60376 | Specification for technical-grade SF6 gas |
| IEC 60480 | Guidelines for re-use of SF6 in electrical equipment |
| ISO/IEC 17025 | Requirements for calibration laboratory competence |
Always refer to the manufacturer’s service manual together with applicable IEC standards before performing field calibration.
Step-by-Step RM6 Density Relay Calibration Procedure
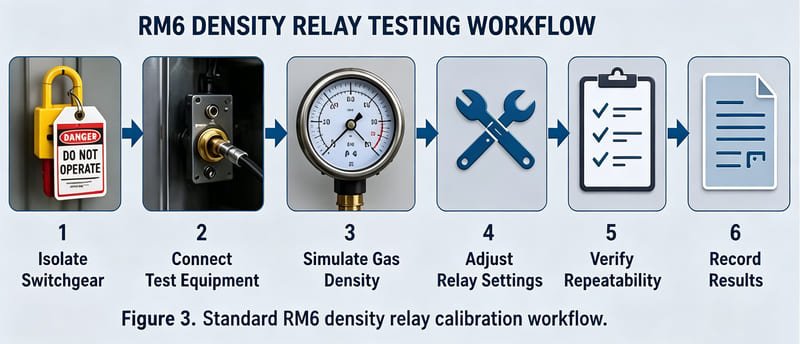
Step 1 Isolate the Switchgear
Ensure the RMU is completely de-energized and reliably grounded. Strictly execute Lockout/Tagout (LOTO) safety rules before any testing, complying with IEC 62271 medium voltage switchgear safety standards.
Step 2 Connect the Calibration Equipment
Fasten the calibration hose tightly to the dedicated relay test port. Verify three key conditions before testing:
- Zero air leakage at all connection joints
- Test equipment pressure range matches RM6 relay rated parameters
- Keep ambient temperature stable to avoid density fluctuation
Step 3 Simulate Gas Density
Raise pressure slowly and record three critical action points carefully:
- Low gas density alarm contact trigger point
- SF6 lockout interlock contact trigger point
- Pressure recovery & contact reset point
Compare all measured switching values against the manufacturer’s standard tolerance range to find calibration deviation.
Step 4 Adjust Relay Settings
If switching points go beyond specification limits, follow standardized adjustment rules:
- Rotate the calibration screw with tiny incremental turns; avoid large one-time adjustments
- Repeat pressure rising & falling test after each fine-tune
- Check hysteresis gap between alarm and reset value
- Record all adjusted parameters completely
Step 5 Verify Repeatability
A single successful test cannot prove calibration stability. Repeat the full pressure simulation cycle three times continuously. All three groups of readings must fall within the manufacturer’s allowable deviation to pass calibration.
Step 6 Record Calibration Results
File complete calibration records for maintenance traceability, including:
- Calibration date & on-site ambient temperature
- Technician name & qualification
- Switchgear and relay serial numbers
- Original uncalibrated switching values
- Final calibrated threshold values
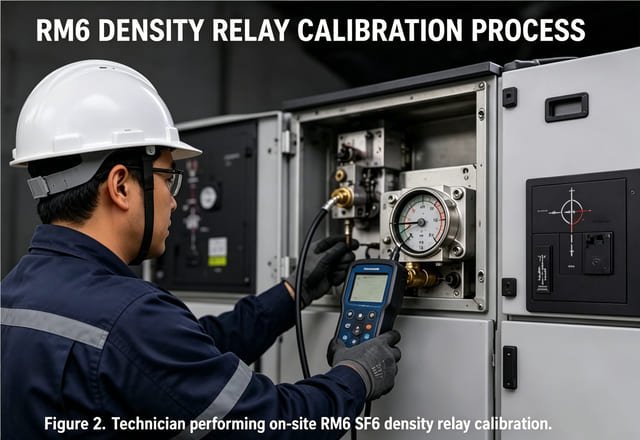
Field Case Study: Eliminating False Alarms Through Proper Calibration
During a routine site maintenance job at a local manufacturing plant, we ran into a tricky issue with several Schneider RM6 switchgears. The unit kept throwing low SF6 density alarms over and over, but we could not find any traceable SF6 leakage after repeated testing.
After checking the density relay parameters, we found the alarm switching point had drifted significantly — off by about 0.04 MPa from the factory standard value. This gradual drift from years of operation was the real reason for the continuous false alarms.
We performed a full recalibration using a certified SF6 density calibrator and validated the results with three full pressure cycle tests to ensure stable and consistent relay action.
Once calibration was completed, the false alarm issue vanished completely. The RM6 switchgear has been running smoothly with no abnormal alarms in follow-up inspections.
This field experience reminds maintenance teams: continuous low gas alarms do not always mean actual SF6 leakage. Refer to our guide covering switchgear SF6 leak root causes & inspection workflow to distinguish real gas loss from calibration false alerts. Always check and recalibrate the relay before replacing parts or disassembling the switchgear blindly.
Common Calibration Mistakes
Most failed calibration results stem from simple operational oversights in field work.
Ignoring Temperature Compensation
SF6 gas pressure changes sharply along with temperature fluctuations. All calibration judgment should depend on gas density instead of raw pressure data. Neglecting temperature compensation is the No.1 trigger of RM6 density relay false alarm.
Using an Uncalibrated Test Instrument
Reference pressure gauges and calibrators must hold valid calibration certificates with higher accuracy class than the tested relay. Out-of-calibration measuring tools produce unreliable test data.
Adjusting the Relay Too Quickly
One large screw adjustment easily overshoots target switching thresholds. Minor repeated tuning delivers far more stable and precise calibration results.
Skipping Contact Verification
Mechanical pressure action alone cannot guarantee intact electrical circuits. Always use a multimeter to confirm alarm and lockout contact conduction.
Failing to Repeat the Test
One qualified measurement cannot eliminate hidden mechanical hysteresis defects. Three rounds of repeat testing are compulsory to confirm long-term stable performance.
Post-Calibration Troubleshooting
If abnormal alarm or switching issues still exist after calibration, match symptoms with root causes below:
| Problem | Possible Cause |
|---|---|
| Alarm still active | Actual SF6 leakage inside switchgear chamber |
| Alarm not resetting | Damaged internal relay mechanical structure or stuck contacts |
| Incorrect switching pressure | Improper calibration adjustment or over-tolerance deviation |
| Contact instability | Internal mechanical aging and wear |
| Pressure drift during testing | Defective calibration equipment or leaking hose connections |
Recommended Calibration Interval
Major switchgear manufacturers and IEC maintenance standards suggest calibration under these scenarios:
- Every 3–5 years during routine preventive maintenance
- Right after SF6 gas refilling or gas recovery operation
- After density relay replacement or cabinet component upgrade
- During full overhaul of RM6 switchgear
- Immediately when irregular false alarms appear
For harsh operating environments with drastic temperature shifts, high humidity or heavy dust, shorten the calibration cycle properly.
Best Practices for Long-Term Reliability
Extend RM6 density relay service life and maintain stable monitoring performance with these rules:
- Archive complete dated calibration records for equipment audit
- Only adopt certified, traceable calibration testing equipment
- Replace aging sealing gaskets immediately to prevent gas leakage
- Inspect real-time SF6 density during annual cabinet maintenance
- Double-check alarm and lockout contact function after every calibration
- Skip unnecessary screw adjustment if measured values stay within factory tolerance
Regular preventive maintenance largely cuts unexpected medium voltage switchgear breakdown risks.
Conclusion
Accurate standard RM6 density relay calibration enables reliable real-time SF6 gas monitoring, drastically reduces nuisance false alarms, and protects RMU equipment from undetected SF6 loss and insulation failure risks.
By following standardized step-by-step calibration workflow, using certified testing instruments, and archiving detailed service logs, maintenance engineers can boost overall substation system reliability while lowering long-term maintenance costs and unplanned downtime.
Whether you maintain Schneider RM6 switchgear or other compatible SF6-insulated ring main units, periodic density relay calibration must be a core part of all preventive maintenance plans.
FAQ – Long-Tail Search Questions
1. How often should an RM6 density relay be calibrated?
Most manufacturers recommend calibration every 3–5 years. Extra calibration is mandatory after SF6 refilling, relay replacement, or abnormal density alarm faults.
2. Can I calibrate an RM6 density relay without removing it?
Yes. Most RM6 density relays support on-site in-place calibration with dedicated SF6 density calibrators. Ensure full cabinet power isolation and complete LOTO safety procedures before field calibration.
3. What causes an RM6 density relay to give false alarms?
False alarms mainly come from ambient temperature swings, long-term calibration drift, aging relay internal components, loose wiring contacts, or minor actual SF6 gas leakage.
4. What equipment is needed for SF6 density relay calibration?
Mandatory tools include SF6 density relay calibrator, high-precision digital pressure gauge, pressure calibration pump, multimeter, plus official manufacturer calibration specification manuals.
5. What happens if the density relay is not calibrated correctly?
Inaccurate calibration leads to persistent nuisance alarms, failure to detect dangerous low SF6 density, unnecessary equipment shutdowns, and weakened insulation protection for the whole switchgear.
6. Why is temperature compensation critical during RM6 relay calibration?
SF6 pressure has strong temperature dependency. Calibration judged by raw pressure data will generate wrong thresholds. Temperature compensation ensures calibration targets true gas density matching real cabinet operating conditions.
Need Professional RM6 Density Relay Calibration Solutions?
Whether you’re maintaining Schneider RM6 switchgear, upgrading SF6 monitoring
devices, or sourcing replacement density relays, our engineering team can help.
We provide:
- RM6-compatible SF6 Density Relays
- SF6 Density Gauges
- Calibration Test Accessories
- RMU Spare Parts
- Technical Documentation
- OEM & Custom Manufacturing Support
Contact Xizi Energy today to discuss your project or request a quotation from our technical specialists.